How to upload a Smart+ Video Upload campaign
5 steps for Smart+ with Upload: BC Auth identity required, direct video, AI handles everything
Complete tutorial to create Smart+ campaigns with Video Upload in BeepMi. Combines TikTok AI automatic optimization (Smart+) with your own videos (Upload), requiring authorized identity (BC Auth or valid identity).
Ideal combo for scaling your own videos (UGC, paid creatives, product edits) with minimal manual setup. TikTok AI handles bid, audience and optimization. You provide video + identity + budget.
Unlike Spark (which uses authorized creator's profile), Upload does not work without identity configured. Without identity, the campaign won't create. The 2 valid options for Upload are:
- BC Auth: TikTok account authorized via Business Center (recommended, real profile)
- User ID (TT_USER): direct identity from TikTok user already linked to the account
Don't forget this step. It's the most common mistake when migrating from Spark to Upload.
Before you start
You need:
- TikTok Business Center connected with campaign creation permission
- Pixel configured on the account (conversion tracking)
- MP4 video already uploaded in Creative Library (or upload now)
- Identity configured in Business Center (BC Auth or User ID)
- At least 1 active advertiser in the profile
Setting up BC Auth identity (recommended)
This is the ideal setup for Upload. Identity tied to a real TikTok profile, with permissions on ad accounts. Do everything in TikTok Business Center before going back to BeepMi.
Connect TikTok profile in Business Center
In TikTok Business Center, go to Assets → TikTok Account → Add. Select "Authorize TikTok Account". Log in with the TikTok account you want to use as ad identity. Accept permissions.
Grant permission to all ad accounts
After connecting the TikTok account, open its profile in Assets → TikTok Account → [your profile]. Click Authorize and select all Ad Accounts that will use this profile as identity. Without this permission, the identity won't appear in the ad account's dropdown when uploading the campaign.
Add member with required permissions
Go to Members → Add Member. Add the user who will manage the campaigns (you or your team) with Operator or Admin permission on the relevant Ad Accounts. Minimum permission required to create Upload campaigns with BC Auth is BC_OPERATOR + AD_ACCOUNT_OPERATOR.
Confirm in BeepMi
Go back to BeepMi, open Power Editor, go to the Creative tab and select Normal mode. The BC Auth identity should appear in the "Identity" dropdown. If it doesn't, review steps 2 and 3 (ad account permission + member with correct role).
Select Smart+ Campaign
In the first Normal tab, select Smart+ Campaign (right card with sparkle icon).
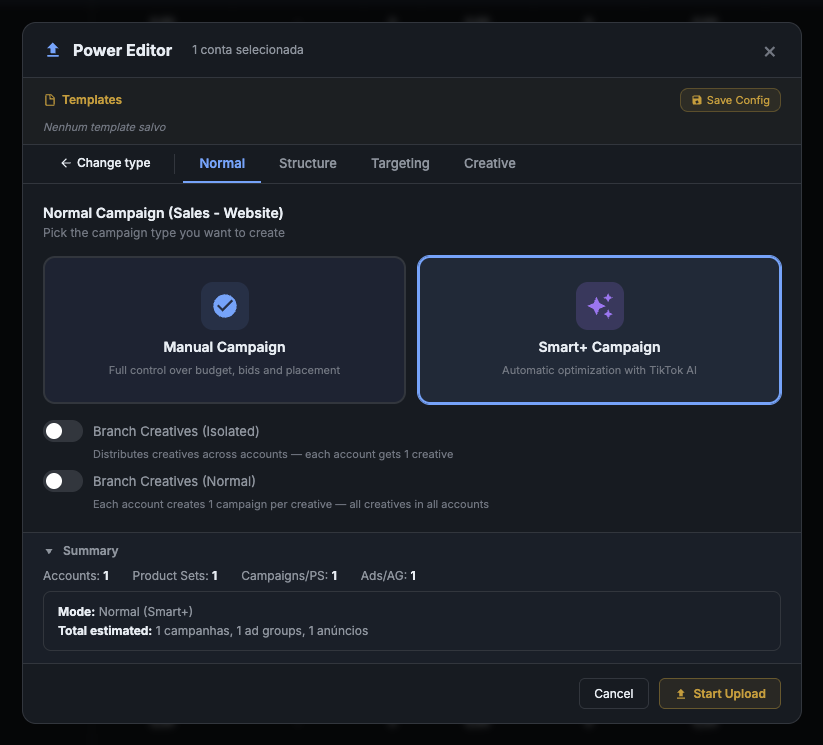
Smart+ Campaign: automatic optimization with TikTok AI. Platform picks best audience, bids, placements on its own.
Simplified structure
The Structure tab. Smart+ requires less configuration than Manual: AI handles most decisions.
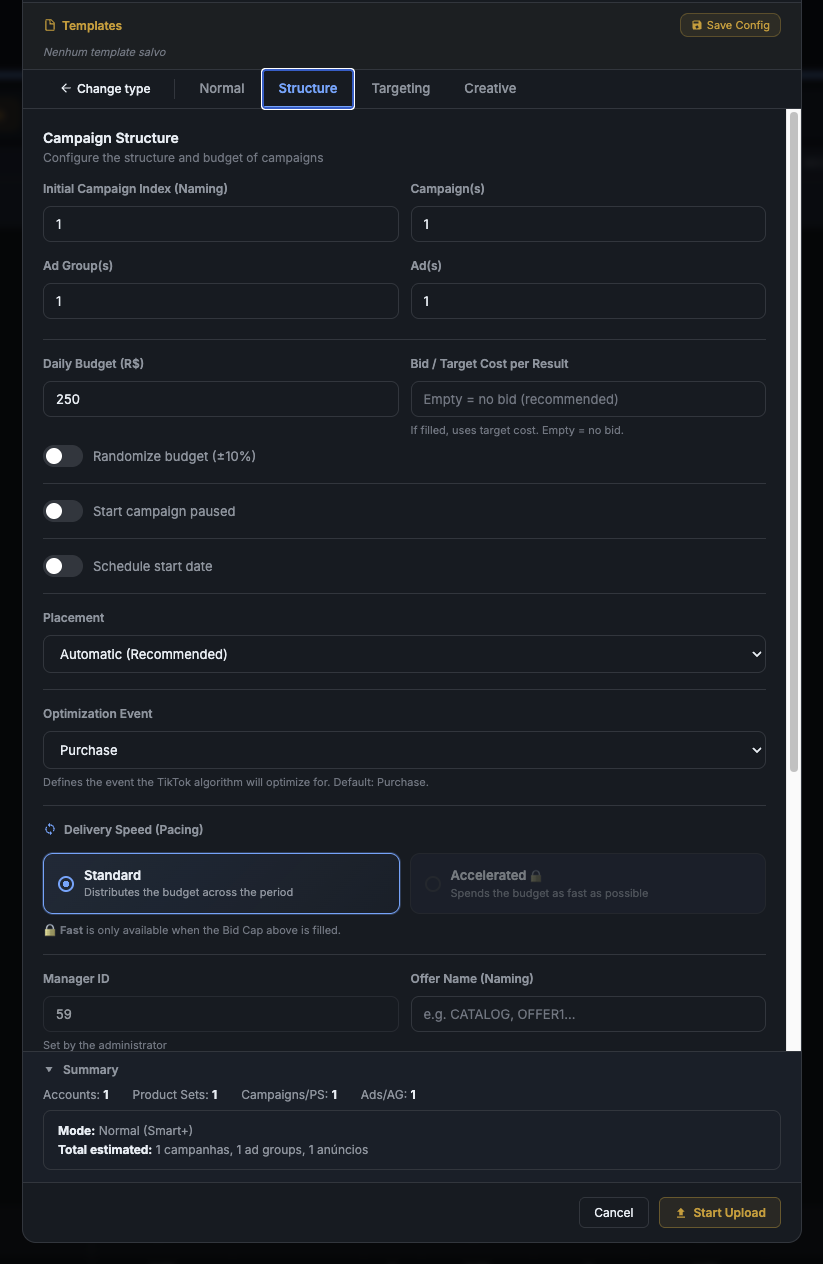
Recommended setup
| Field | Default | When to change |
|---|---|---|
| Initial Index | 1 |
Keep 1 for first batch |
| Campaign(s) | 1 |
Increase to run multiple in parallel |
| Ad Group(s) | 1 |
Smart+ recommends 1 ad group per campaign |
| Ad(s) | 1 |
Increase if multiple videos in same ad group |
| Daily Budget | $250 |
Smart+ needs ≥ $100/day to learn |
| Bid / Target Cost | empty | Smart+ works best without bid cap (let AI decide) |
| Placement | Automatic (Recommended) |
TikTok picks best placement per user |
| Optimization Event | Purchase |
Purchase for ecommerce. Add to Cart for ToFu |
Smart+ doesn't support "Accelerated" delivery. AI distributes budget throughout the day automatically.
Countries, languages and ID
Continuation of Structure: defines geographic target market and internal ID.
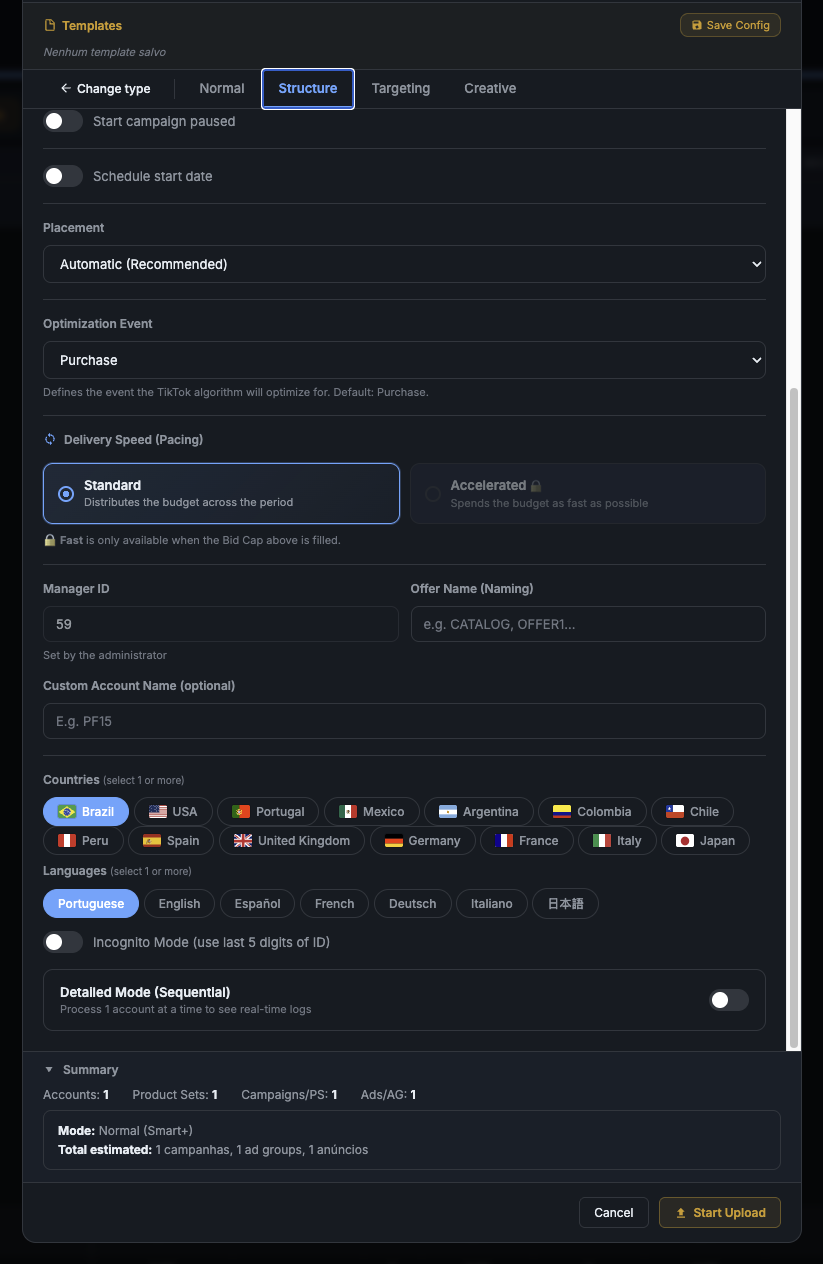
What each field does
- Manager ID: internal identifier (set by admin). Appears in campaign name.
- Offer Name: part of the naming convention. E.g.:
OFFER1,BLACK-FRIDAY. - Custom Account Name: optional label for identification.
- Countries: TikTok requires ≥ 1. Brazil default for Brazilian ecommerce.
- Languages: align with target market.
Reduced targeting (AI decides)
The Targeting tab in Smart+ has fewer options than Manual. AI picks detailed audiences automatically.
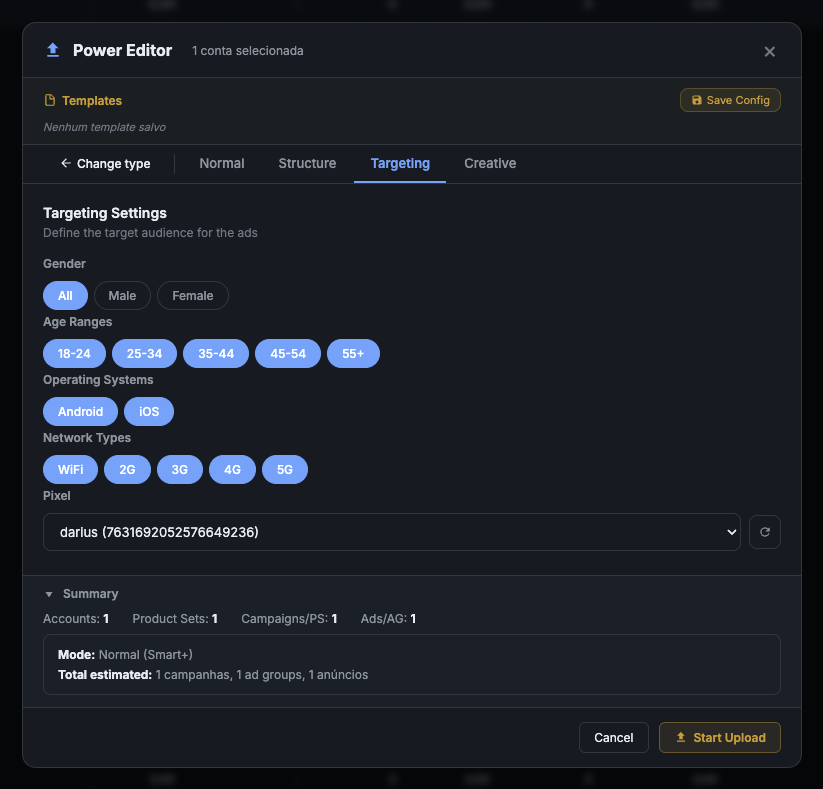
Recommended setup
- Gender:
All - Age Ranges: check all (
18-24,25-34,35-44,45-54,55+) - Operating Systems:
Android + iOS - Network Types: all (
WiFi,2G,3G,4G,5G) - Pixel: select the account's pixel (required)
Smart+ depends entirely on pixel to optimize. If the dropdown is empty, go to Settings : Pixels and register the account's pixel before continuing.
The key difference: identity required
Here's where Smart+ Upload diverges from Smart+ Spark. You need authorized identity + video from gallery. Without identity, the campaign WON'T create.

Select "Normal" (not Spark Ads)
In Creative Settings, click the Normal card (left, upload icon). This activates Upload mode.
Identity: the 2 options that work
Authorize an existing TikTok account as identity for your ads via Business Center. Advantages:
- Real logo + name + profile
- Professional and native appearance in feed
- Reusable across multiple campaigns
- Posts tied to official profile (aggregated analytics)
How to authorize: In TikTok Business Center, go to Assets → Authorized accounts → Add → TikTok Account. Log into the profile you want to use as identity. Grant permissions. Come back to BeepMi and select in dropdown.
Direct identity from a TikTok user already linked to the ad account (without needing BC Auth). Advantages:
- Simpler setup (no BC Auth needed)
- Good for individual or test accounts
- Existing identity, nothing new to create
Appears in dropdown automatically if there's a TikTok user connected to the ad account.
Even if the UI shows "+ New identity" button, the identity created (CUSTOMIZED_USER type) does not appear in the selector dropdown for Upload. TikTok limits: for Upload, only TT_USER and BC_AUTH_TT are valid. Use BC Auth or User ID.
Useful for mass automation when some accounts don't have identity. When enabled, BeepMi tries to resolve identity automatically. In production it's safer to leave disabled and configure BC Auth manually on each account before uploading.
Ad Video
Gallery shows videos from BeepMi's Creative Library. Select 1 or more (if Branch is on).
Display Cards (Banner)
Smart+ Upload supports banner (unlike Smart+ Spark which TikTok blocks via API).
- Display Cards: optional. Appears at video bottom after X seconds
- Display Time: default
2 seconds - Pick from Gallery: use already-created banner
Link, CTA and UTM
- Site Link: full landing page URL
- Ad Copy: video caption (max 100 chars recommended)
- Call to Action:
Learn More(ToFu),Shop Now(BoFu)
Controls
- Disable comments: recommended on new ads
- Disable download/sharing: protects your video
- Enable search results: only if you want it in organic search
Default UTM
utm_source     = __PLACEMENT__
utm_medium     = __AID_NAME__
utm_campaign   = __CAMPAIGN_NAME__
utm_content    = __ADGROUP_NAME__
Ready to upload
- Go back to Normal tab
- Confirm the Summary:
Mode: Normal (Smart+)+ estimated campaigns - Click Start Upload (orange button)
- Watch real-time log
Don't pause/edit the campaign during this period. AI is gathering data. Initial metrics are usually bad (high CPM, expensive CPA), but stabilize after 50-100 conversions.
Common errors + fix
| Error | Cause | Fix |
|---|---|---|
40044 - identity not found |
Account without authorized identity | BC Auth or enable "Create new identity" |
40016 - pixel not found |
Pixel not selected in Step 4 | Go back to Targeting and pick pixel |
Video format not supported |
MP4 outside TikTok standard | Use H.264, max 60s, max 500MB, vertical 9:16 |
Identity creation failed |
Invalid logo/name in "New Identity" | Logo: PNG/JPG square, min 100×100px |
| Smart+ doesn't optimize after days | Budget too low | Increase to ≥ $100/day |
Optimization event not supported |
Smart+ + advanced event combo | Use Purchase or Add to Cart |
Next steps
- How to upload Smart+ Spark Ads: Smart+ with Spark (no banner)
- How to upload Manual Upload: full control + banner
- How to upload Manual Spark Ad: with authorized organic profile