Model 1 vs Model 2: which to use?
Differences, use cases, performance and when to enable each one

The BeepMi Ads Manager has 2 different visuals for the same data: because agencies and in-house teams think about campaigns in completely different ways. Both show the same data pulled from TikTok, only the way you see it changes.
Model 1 is hierarchical (tree). Model 2 is funnel-level (tabs). Different teams prefer each one. You can switch anytime.
30-second summary
Hierarchical
Adset → Ad
- Expandable tree
- "One account at a time" focus
- Infinite drill-down
- Account-level filters
- Great for multi-client agencies
Tabs (by funnel)
Campaigns | Adsets | Ads
- 1 table per level
- "All campaigns together" focus
- Cross-account comparison
- Richer filters
- Great for in-house / aggressive scale
The 24h trial and Growth/Scale plans only have Model 1. M2 is the "advanced mode": for teams managing 50+ campaigns at the same time that need a portfolio view.
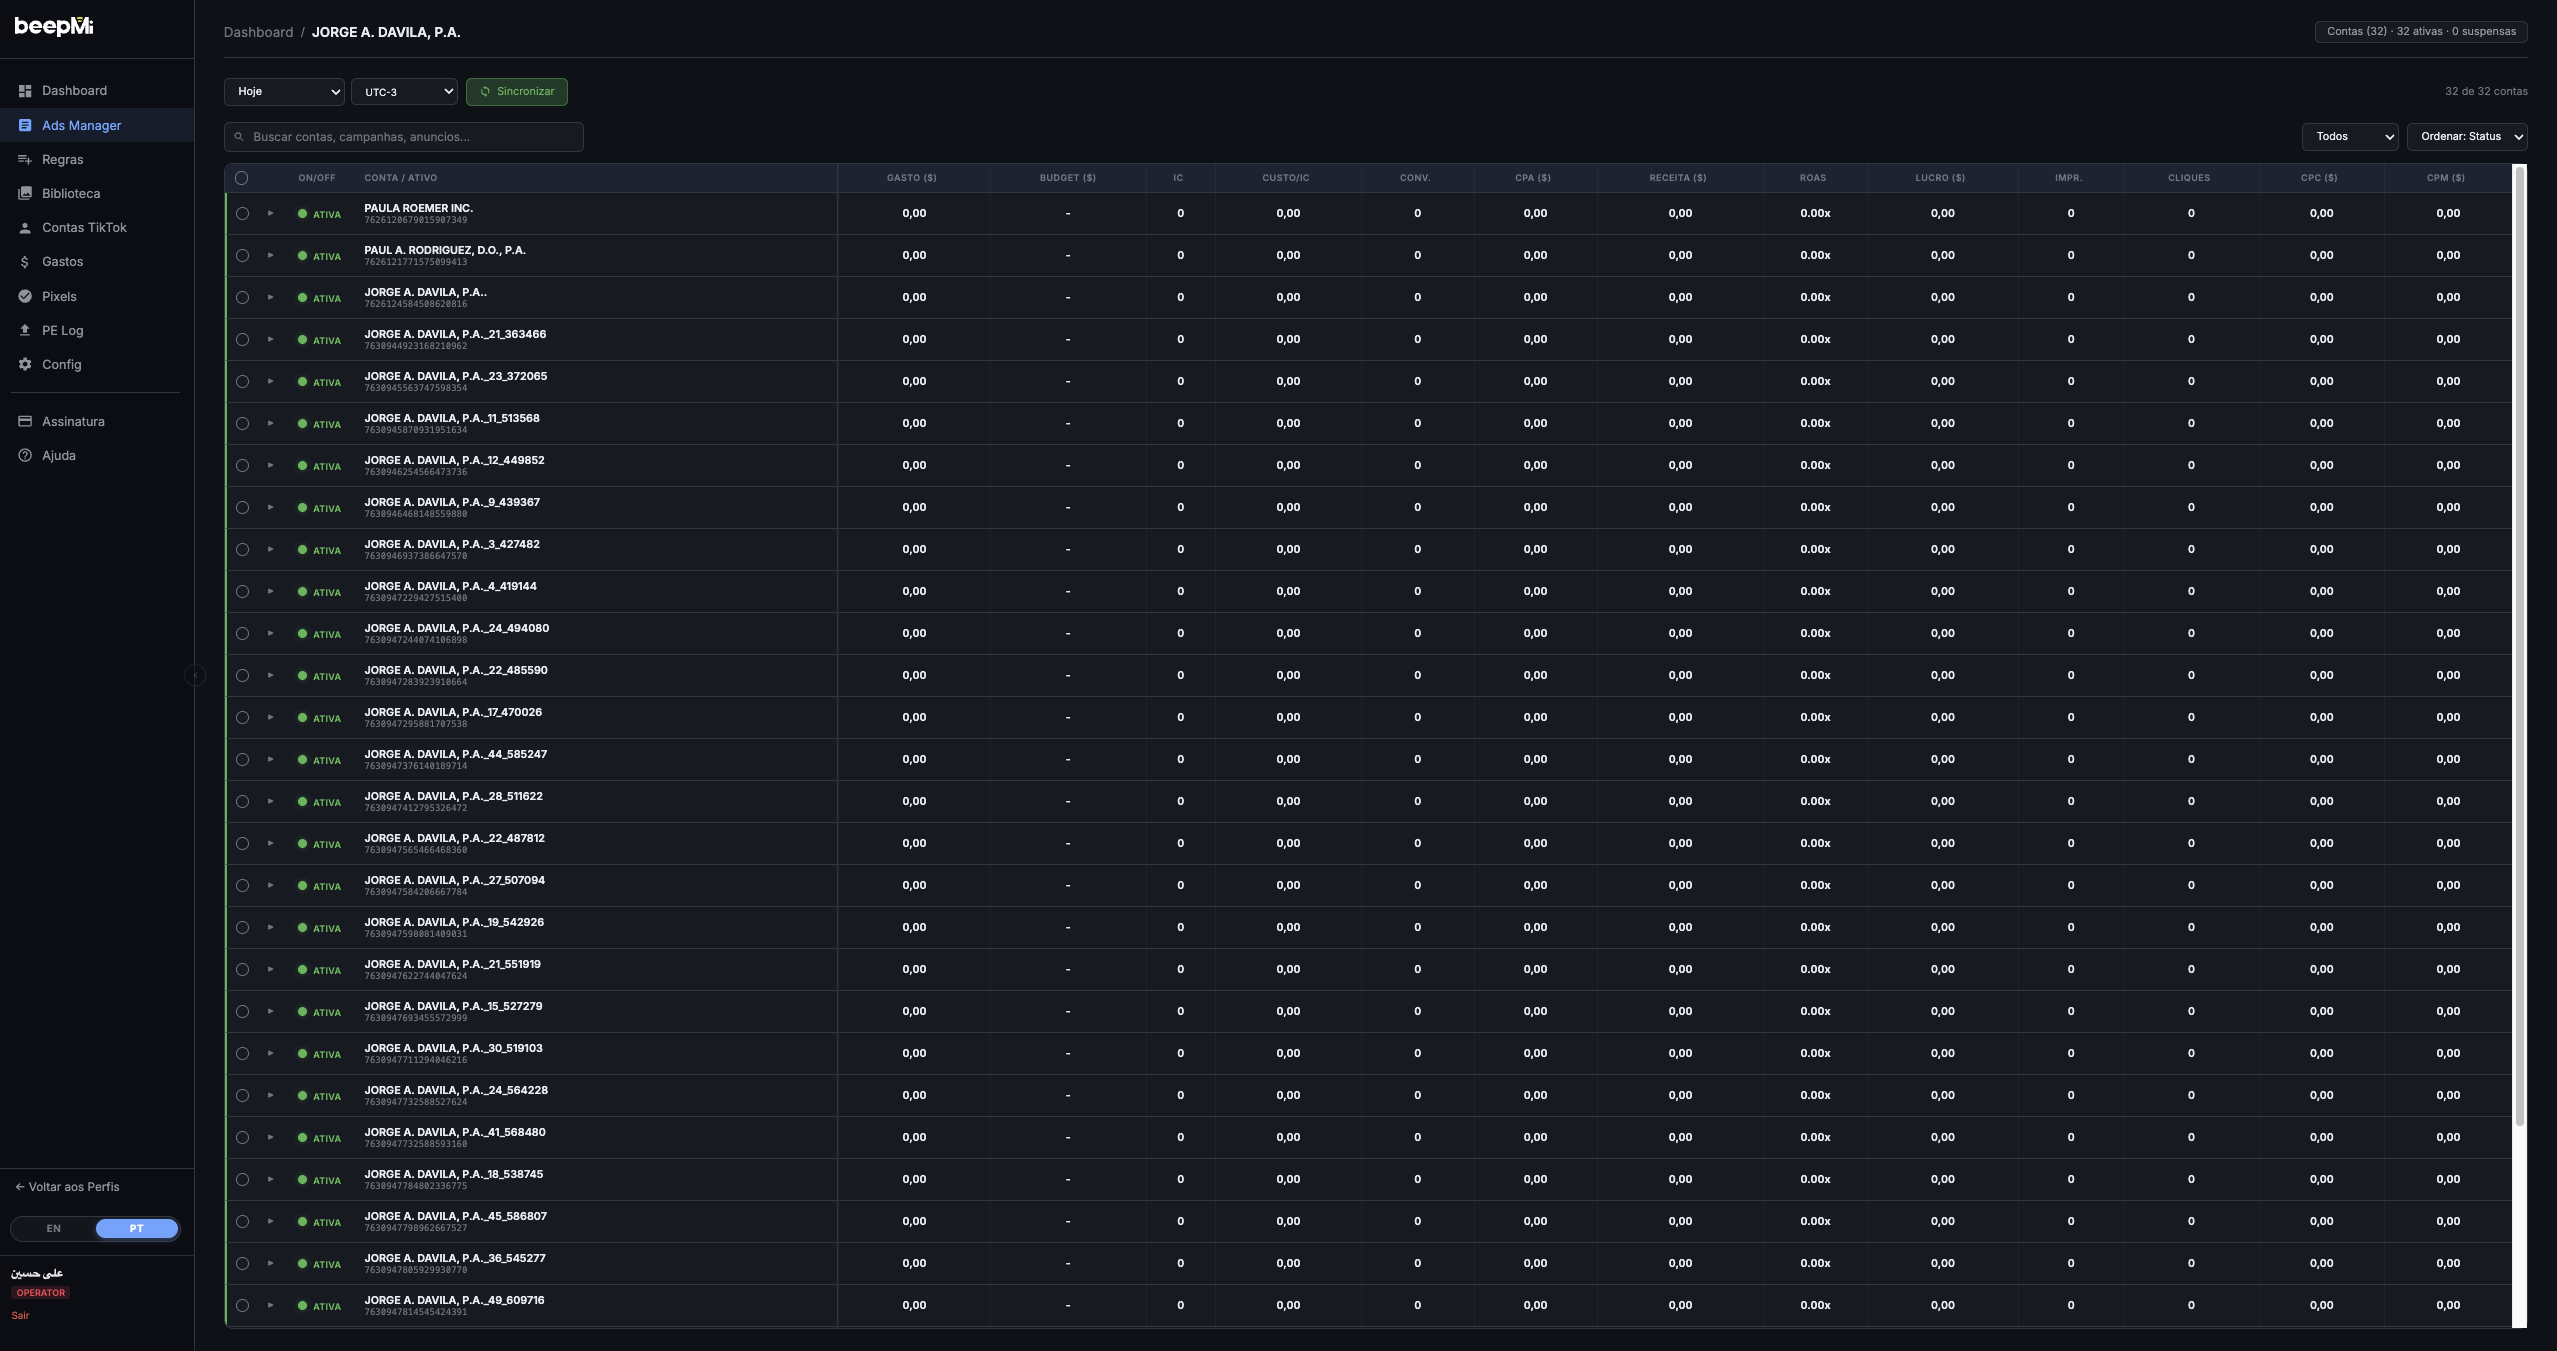
Model 1: Hierarchical
How it works
Each account becomes a "parent" row
BeepMi pulls every ad account in the BC and shows them ordered by spend. Each one displays status (Active/Suspended), ID, campaign count, and aggregate metrics.
Click the arrow to expand child campaigns
Expand level by level: account → campaign → adset → ad. Each level visually indents. Close when done and open the next account.
Bulk actions per account
Pause/enable ALL campaigns of a single account with one click. Useful when an account got suspended or a client wants to halt everything.
When to use Model 1
- Multi-client agencies: you think "John's account", "Mary's account", one at a time
- Teams running 5–30 accounts: drill-down is still manageable
- Initial setup / debugging: easy to see "this account has $0 spend, why?"
- Trial 24h and Growth/Scale plans: it's the only model available
Model 2: Tabs (by funnel)
How it works
4 tabs at the top: Accounts, Campaigns, Adsets, Ads
Each tab is a different view. Inside "Campaigns" you see EVERY campaign from EVERY connected account: regardless of BC or ad account. Sorted by spend by default.
Powerful filters on top
Filter by name, status, ROAS >X, spend >X, etc. You can save filter combinations as "presets" (e.g. "Top performers", "Budget vampires").
Footer with cross-account totals
"115 campaigns, $1,250 spent, ROAS 3.20x": entire portfolio at a glance. Impossible to get from Model 1.
Massive bulk actions
Select 50 campaigns from 12 different accounts and pause/enable them all at once. Inline budget editor. Multi-edit cross-account.
When to use Model 2
- E-commerce in-house teams: one brand, several accounts, you want everything aggregated
- Aggressive scaling: 50+ campaigns running at the same time across multiple accounts/BCs
- Cross-account analysis: "what's the average ROAS across accounts?", "which account has the worst CPA?"
- Large bulk operations: pause 30 campaigns with ROAS < 1.0 in one click
How to actually use the Ads Manager
Regardless of the model you pick, the workflow is the same: 1. Sync → 2. Expand the hierarchy → 3. Read metrics → 4. Bulk actions.
1. Sync: to pull all campaigns
When you open the Ads Manager for the first time (or after a long break), campaigns show as zeroed out or stale. That's by design: BeepMi doesn't hammer TikTok 24/7. You sync on demand.
Depends on the number of accounts: 1 account = ~2s · 10 accounts = ~10s · 50 accounts = ~30s · 100+ accounts = 1-2min. BeepMi parallelizes calls (up to 8 at a time) and shows the progress bar ("15 ok / 0 errors · 1.6s") while it runs.
We recommend clicking Sync at the start of the day to see fresh numbers. During the day, the automation rule engine reads TikTok in real time anyway: you don't need to sync for rules to fire.
2. Expand the hierarchy: click the ▶ arrows
In Model 1 (Hierarchical), each row is one level: account → campaign → adset → ad. To open children, click the ▶ arrow on the left of the row. The arrow flips to ▼ (pointing down) and the children appear indented below.
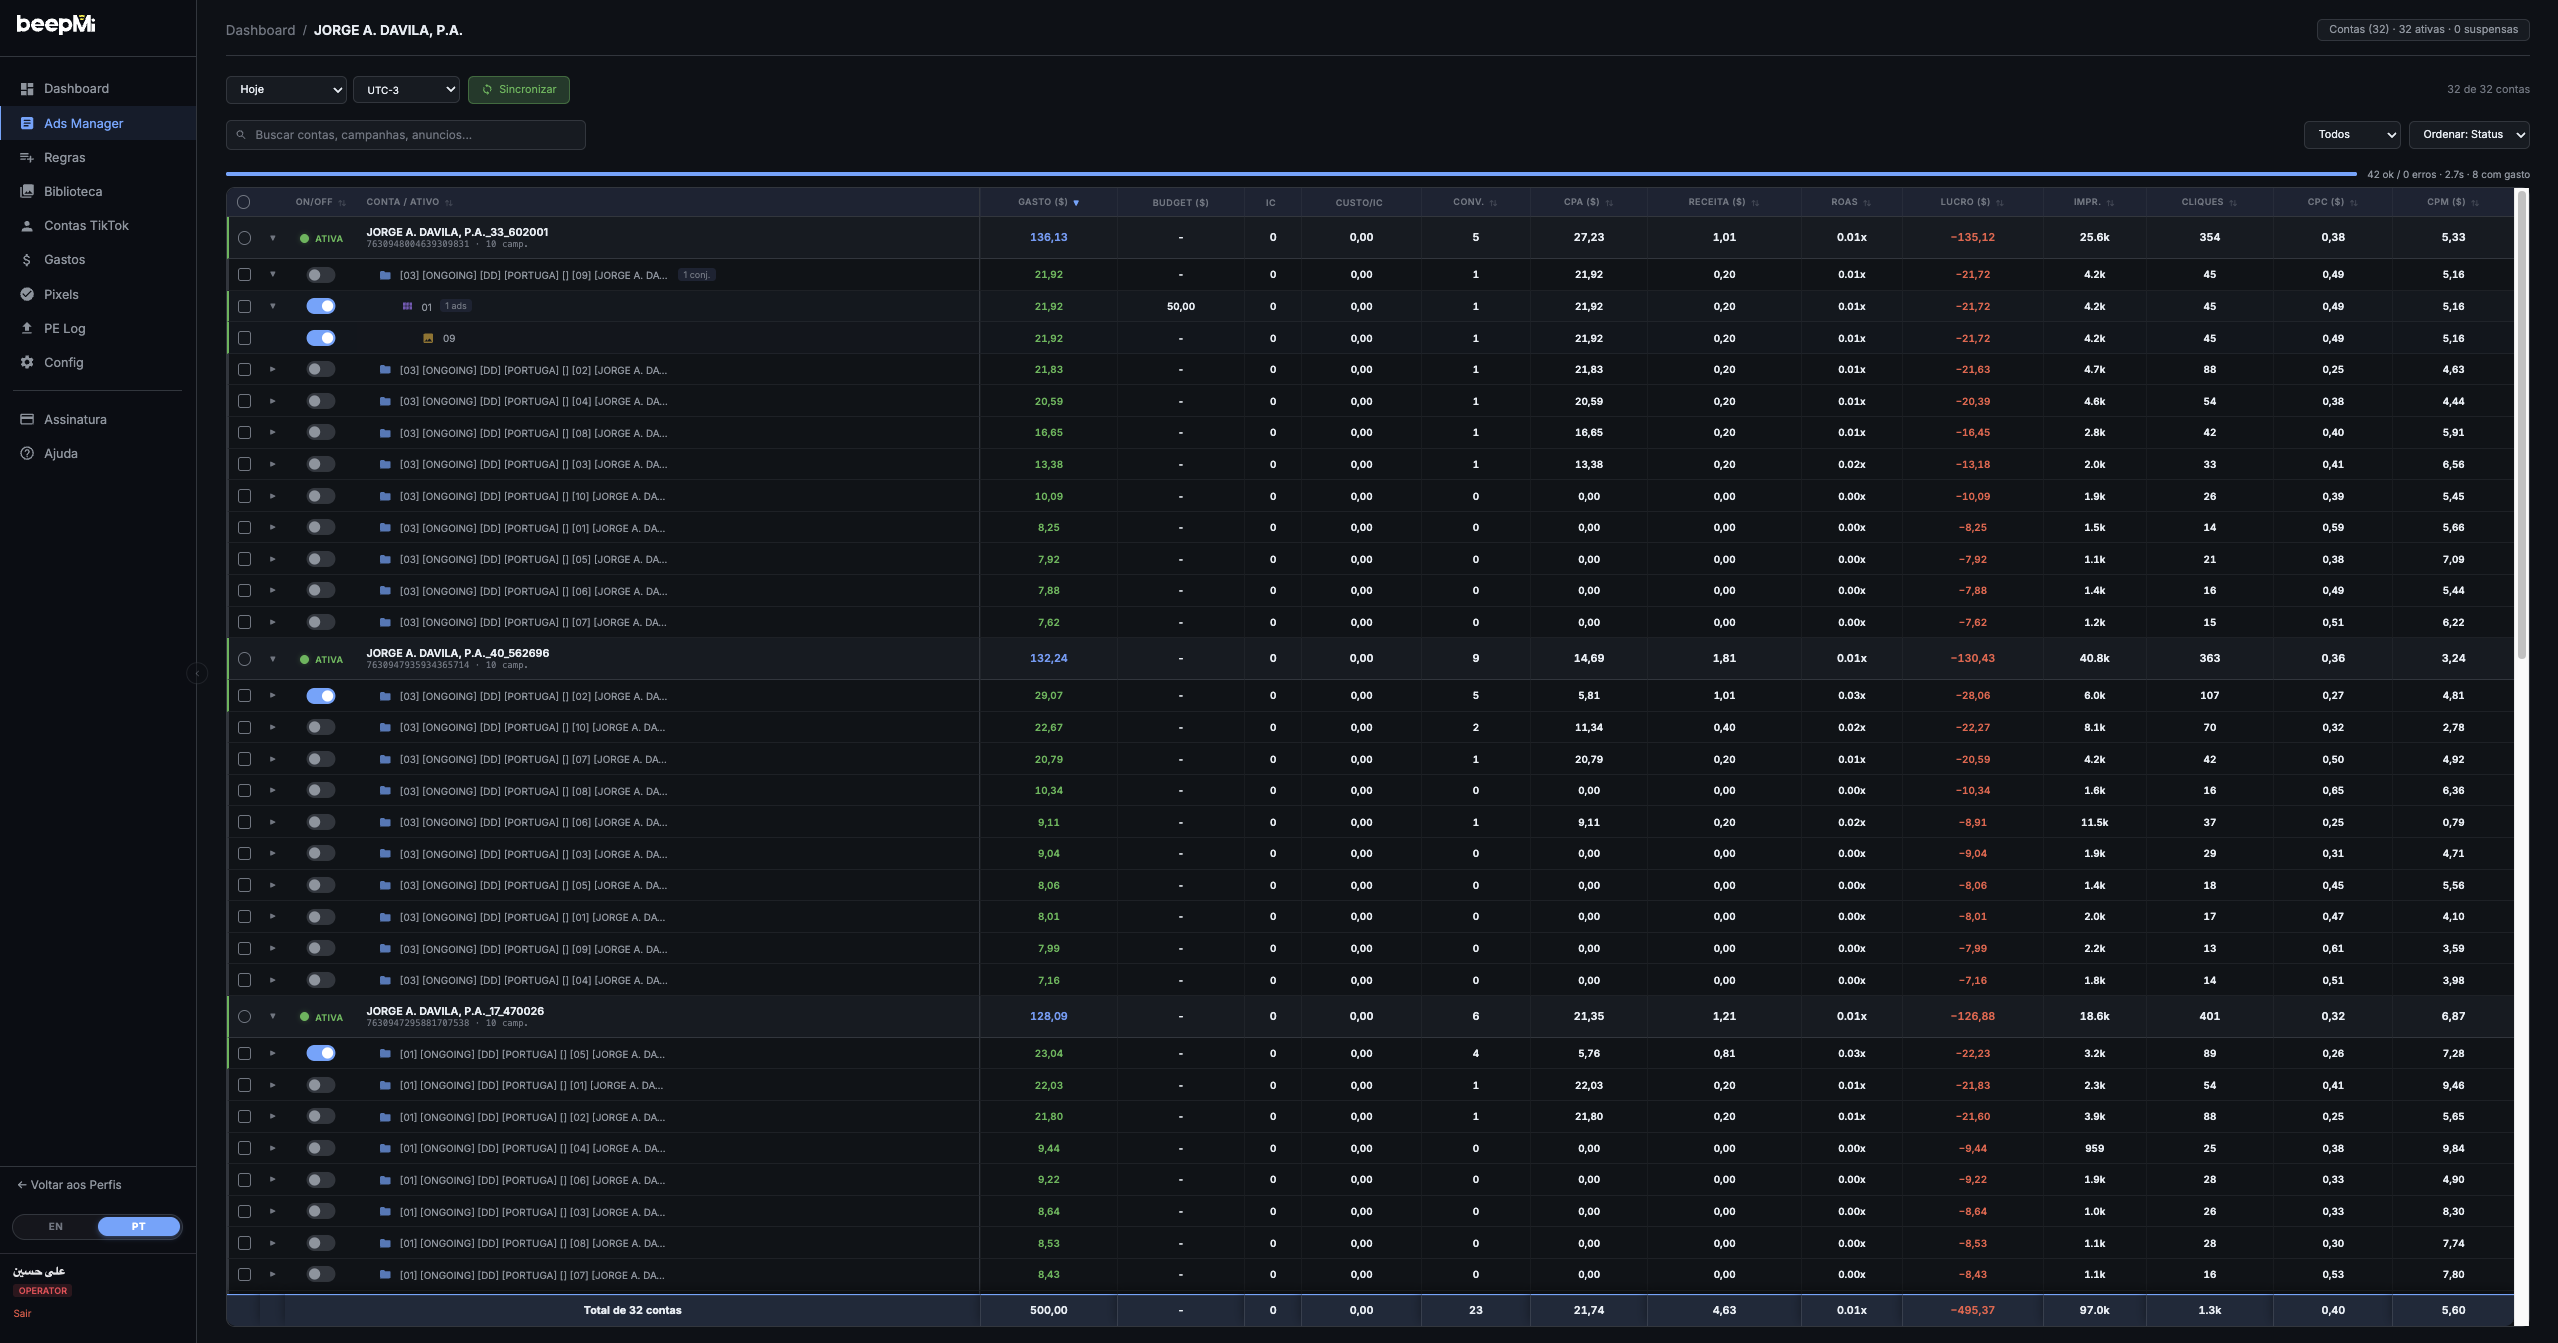
Click ▶ on an account → reveals all campaigns
You see each campaign's name, status (Active/Suspended), spend, ROAS, etc.
Click ▶ on a campaign → reveals all adsets
Adsets are where you set audience, age, placement and adset-level budget.
Click ▶ on an adset → reveals all ads
Each ad is a video + CTA + landing page. This is where you pause poor-performing creatives and keep the winners.
Shift + click on the account's arrow expands EVERYTHING at once (campaigns, adsets and ads). Useful to see the full portfolio of an account without 30 clicks.
3. Metrics: what each column means
The table has 15 columns. You can sort by any of them by clicking the header (↕ shows next to the name). Default: sorted by Spend descending (you find quickly where the money is going).
| Column | Meaning | When to look |
|---|---|---|
| ON/OFF | Activate/pause toggle (green = on, grey = paused) | Always: controls whether the campaign is running |
| ACCOUNT / ASSET | Account/campaign/adset/ad name + ID + child count | Visual identification |
| SPEND ($) | How much was spent in the period (Today, Yesterday, 7d, etc) | Always: primary metric |
| BUDGET ($) | Daily or total spending limit of the campaign | To compare spend vs limit |
| IC | Initiated Checkout | E-commerce: funnel conversion |
| COST/IC | Average cost per IC | To see if IC is expensive |
| CONV. | Conversions (purchases / leads / whatever's tracked) | Always |
| CPA ($) | Cost Per Acquisition = Spend ÷ Conversions | Main efficiency metric |
| REVENUE ($) | Total sales tracked by the Pixel | To calculate real ROAS |
| ROAS | Return On Ad Spend = Revenue ÷ Spend (e.g. 3.42x) | Profitability metric |
| PROFIT ($) | Estimated profit (Revenue − Spend, before COGS) | Green = positive, red = negative |
| IMPR. | Impressions: how many times shown | Delivery volume |
| CLICKS | Clicks on the ad | Engagement |
| CPC ($) | Cost Per Click = Spend ÷ Clicks | Creative efficiency |
| CPM ($) | Cost Per Mille (1000 impressions) | Auction health (high = high competition) |
Green ROAS (≥1.0x) = ad paid for itself · Red ROAS (<1.0x) = losing money · Green PROFIT = positive · Red PROFIT = negative. BeepMi calculates everything automatically: you just read.
4. Bulk actions: select multiple rows and act
When you check the box on one or more rows, the purple bulk-action bar appears at the top of the table. This is where you execute changes in batch (without opening each campaign one by one).

| Button | What it does | When to use |
|---|---|---|
| ✏ Change Budget | Updates the budget of multiple campaigns/adsets at once (fixed value, +%, -%) | Aggressive scaling: bump top performers by 20% |
| 🤖 Automation Rules ▼ | Applies a saved automation rule to the selected rows | Bulk-attach: pause high CPA on 50 campaigns |
| ▶ Activate | Turns ON everything that's paused | Reactivate the portfolio after Sunday/holidays |
| ‖ Pause | Turns OFF everything selected | Emergency pause (banned BC, problematic creative) |
| 🗐 Duplicate | Clones selected campaigns/adsets | Replicate a winning campaign across other accounts |
| 🗑 Delete | Permanent removal (no undo) | Cleanup of zombie old campaigns |
| ↑ Upload Campaigns | Bulk-upload new creatives to selected campaigns (inline Power Editor) | Swap creatives in batch without leaving Ads Manager |
There's no undo. Use Pause if you only want to stop the campaign: you can reactivate it later. Only Delete campaigns that will NEVER run again.
1) Filter by "ROAS < 1.0" · 2) Select all · 3) Click Pause. In 5 seconds you've paused every loser in your portfolio and only the profitable ones keep running. Repeat weekly.
Quick comparison
| Criterion | Model 1 (Hierarchical) | Model 2 (Tabs) |
|---|---|---|
| Visual | Expandable tree | 4 tabs by level |
| Focus | One account at a time | Entire portfolio |
| Sort | Per account (alpha/spend) | Per level (cross-account) |
| Bulk action | Limited to 1 account | Cross-account, no limit |
| Filters | Basic | Advanced + presets |
| Revenue tracking | Per campaign | Cross-account + footer total |
| Available on | Trial / Growth / Scale / Dominate | Dominate only |
| Learning curve | Low | Medium |
| UI performance | Fast (lazy expand) | Faster (single query) |
Can I use both?
On the Dominate plan you'll see a toggle in the upper corner of the Ads Manager. Switch between Model 1 ↔ Model 2 anytime. Filters don't persist across modes (each has its own).
How to enable Model 2
Get on the Dominate plan
Go to Billing → Switch plan → Dominate. After upgrading, the toggle appears automatically in Ads Manager.
Click the "Model 2" toggle
Top-right corner of the Ads Manager screen. Two buttons: Model 1 and Model 2. The active one is highlighted in purple.
BeepMi reloads with the new view
Your preference is saved per profile. Next time you open it, it goes straight to Model 2.
Even on the Dominate plan, we recommend starting with Model 1 for the first few days. Once you've memorized your account structure, switch to Model 2: it'll feel "infinitely better".
Next steps
Create your first automation rule · Compare plans · Launch 50+ campaigns via Power Editor
